E14 | Ridgewood Colonial Revival | Rocking Fountain
Season 46 Episode 14 | 23m 42sVideo has Closed Captions
Jenn and Mark team up to install a custom-made water feature for the backyard patio.
Kevin O'Connor and tile installer Gary Moreland, install large tile in a curbless shower. Later, wood flooring installer Bill Verone explains how adhesive serves as an additional moisture barrier. Upstairs, Zack Dettmore and Charlie Marshall install a hidden door. Outside, Jenn Nawada, Mark McCullough, and homeowner's daughter Genevieve set up a large boulder for a new water feature.
Funding for THIS OLD HOUSE is provided by The Home Depot and Renewal By Andersen.
Support provided by:


E14 | Ridgewood Colonial Revival | Rocking Fountain
Season 46 Episode 14 | 23m 42sVideo has Closed Captions
Kevin O'Connor and tile installer Gary Moreland, install large tile in a curbless shower. Later, wood flooring installer Bill Verone explains how adhesive serves as an additional moisture barrier. Upstairs, Zack Dettmore and Charlie Marshall install a hidden door. Outside, Jenn Nawada, Mark McCullough, and homeowner's daughter Genevieve set up a large boulder for a new water feature.
How to Watch This Old House
This Old House is available to stream on pbs.org and the free PBS App, available on iPhone, Apple TV, Android TV, Android smartphones, Amazon Fire TV, Amazon Fire Tablet, Roku, Samsung Smart TV, and Vizio.
Keep Exploring


This Old House Insider Newsletter
Get This Old House exclusive stories, tips, and behind-the-scenes information delivered right to your inbox every month.Providing Support for PBS.org
Learn Moreabout PBS online sponsorshipKevin: Today on "This Old House," On our first-floor bathroom, we are using a large porcelain tile that has to be cut so our shower pan drains properly.
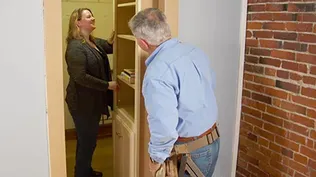
Zack: So, we folded the hardwood floor up the wall, and then we'll have sort of a concealed door.
Mark: And we're going to turn this boulder... Jenn: Into a water feature.
♪♪ Man: Ahh.
That's it.
♪♪ ♪♪ ♪♪ Kevin: Hey there, I'm Kevin O'Connor.
And welcome back to "This Old House" and to our project here in Ridgewood, New Jersey.
Zack, good to see you.
Zack: Good to see you, Kevin.
Kevin: I like to see the progress you guys are making.
Zack: Yeah.
See, since you were here last, we got drywall up, some floors going in.
I'm just working on the trim work now.
Kevin: Alright.
Very nice.
I'm gonna take a tour.
I'll catch up with you later.
Zack: Alright.
See you in a bit.
Kevin: So on this side of the house, the old family room, you can see it right here.
Long front to back.
There was some track lighting the homeowners wanted down, replaced with recessed in the ceiling.
There were two doors to this office on the other side of the wall, or a Maplewood room.
This door has been closed over and the window has been replaced, taking in the beautiful views of the backyard.
Other than that, pretty much the same.
You can see that we are saving the wood floors.
A couple patches here and there, but more importantly, they're going to get sanded down and a new color and a new coat of poly.
So it looks like the homeowner is trying to make decisions on color from light all the way over to dark, a medium brown.
These floors, original, stay up until about here, and then we feather in new ones as we come down the hallway.
There was a tiny little half bath down here.
Now it's going to be a full bath.
Gary, good to see you again.
Gary: Hey, Kevin.
How you doing?
Kevin: I'm doing alright.
Look at this big, beautiful bathroom, huh?
Shower as well.
Gary: Yeah.
Today we're putting a 24x48" porcelain on the shower floor.
Kevin: Big tiles.
But I also noticed when I walk through, the whole room is orange, so the whole room is waterproof?
Gary: The whole room's waterproof.
We're going floor-to-ceiling tile around the whole room.
Kevin: So floor and walls?
Gary: Floor and walls.
Yeah.
Kevin: Oh, very cool.
Gary: We even have a curbless shower.
So we even go from flat to pitch.
Kevin: So curbless so you can roll right in here.
So this is obviously our shower pan?
Gary: That's right.
Kevin: So how do you attack this guy?
Gary: Well, we have to make sure we envelope-cut so that the water drains.
Kevin: I can see where you get the name envelope cut.
It's pretty obvious, right.
Gary: So in order to do that, we go from the corner of the drain to the corners and make sure the water goes down.
Kevin: So that explains your diagonal lines.
The perpendicular lines here to each other, what are those?
Gary: Those are my centers.
So this represents one center tile with an even cut there, even cut here.
Kevin: So this one, if you will -- just get this down, tuck it in.
You're gonna cut this one.
This will be narrower.
Gary: That's right.
Kevin: So you make a cut here.
You'll make your diagonals.
Gary Right.
Kevin: Do you let it run long into the room to sort of pick up?
Gary: No.
We'll have to cut right here, representing our shower stall, because if we didn't, if you look over here, we won't have enough pitch to the drain.
Kevin: Where do you go from here?
Gary: I have to transfer these lines that I drew on the shower pan, and now I have to make them on the actual tiles.
Then we can start cutting.
Kevin: Let's go do that.
Gary: So, here I've established my shower footprint.
Kevin: Right.
Gary: And I've also established my shower center drain, which is right here.
Kevin: So you've just pulled measurements off of the walls to get that?
Gary: That's right.
Kevin: Okay.
Gary: Now we transfer these li-- the lines in there to out here.
Kevin: So three full pieces.
You cut the break line where we went from flat to pitch.
Gary: Break lines already cut.
Kevin: The center one stays the same width.
Gary: Yep.
Everything comes off the center.
And now I have to cut my front-to-back pieces, which is 17 1/2 and 17 1/2.
Perfect.
Kevin: So that we cut and then same on the other side?
Gary: That's right.
Kevin: Okay.
Gary: Now I mark the drain.
And all that's left is to connect the corners four times over.
Okay, now that we have our four marks, we could begin to cut.
This tile I could cut first on my score and snap, being that it's a straight cut.
The other ones.
I'll use my grinder.
♪♪ ♪♪ It's four relief cuts, so I could bring myself from here to there.
Kevin: Okay.
♪♪ Gary: So I have a four-inch grinder with a diamond blade.
I'm going to make a couple of passes.
Just follow me with the vacuum.
Kevin: You got it.
♪♪ Gary: Okay, now let's sand down the rough edges.
See if they fit.
Kevin: May I?
What are we working with?
Gary: This is a hand diamond polishing pad.
It cleans up all the rough edges that we just made.
Kevin: Check that out.
So those are all diamonds right there.
And then just... [ Scraping ] So a whole bunch of cuts and then a whole bunch of buffing.
Gary: Oh, yeah.
♪♪ I've never hoped my measurements worked out more than right now.
Kevin: Oh, I've got almost complete confidence in you.
[ Both chuckle ] Gary: We'll start at the control line and work back.
Kevin: So that's where you kind of measure it off, right there?
Gary: Yes.
Kevin: Alright.
So the left.
Gary: Start with number one.
Kevin: There's one.
This is just a dry lay.
You're running out of room.
[ Laughs ] Gary: Got to work backwards.
Last piece.
Kevin: Okay.
Seven it is.
What do you think?
You happy?
Gary: It's perfect.
Kevin: Beautiful envelope cut right there.
Nice job.
Gary: I'll take it.
♪♪ Kevin: Hey, Bill.
Good to see you again.
Bill: Morning, Kevin, how are you?
Kevin: I'm doing alright.
How's our moisture?
Bill: Good.
We're just -- I'm just doing some moisture readings now.
Kevin: What are you getting?
Bill: And we're getting 7 1/2%, which is ideal.
We like to be around 7%.
Kevin: Very nice.
Bill: So that's good.
Kevin: Okay.
This is engineered, obviously.
Bill: It is engineered.
Kevin: We got the stable substrate.
Bill: Yes.
Kevin: And then on top of it we've got the real wood.
So that's a relatively thin -- That's a pretty good-size layer.
Bill: Four-mil wear layer.
Kevin: Four mil?
Which means you can sand it.
Bill: It can be sanded, yes.
Kevin: How many times?
Bill: Can be sanded up to four times, Kevin.
Kevin: Alright.
So no beveled edge.
So when this goes down, is your first pass going to be a quick sanding and then stain?
Bill: So from the manufacturer it comes almost pre-sanded.
Like -- And then we just give it a very light sanding first time.
We're not trying to take any life away from it.
And then you can sand it three to four times after that.
Kevin: Alright.
That's awesome.
So you're going straight to slab.
You guys have got some done.
Are you ready to keep the process going?
Bill: I am.
Kevin: Let's do that.
I'll follow along.
So what can you tell me about the adhesive?
Bill: So this particular adhesive is zero VOC.
Kevin: Yeah.
Bill: It also has some moisture-resistant properties to it.
Kevin: So almost like an additional moisture barrier for us.
Bill: Exactly.
Kevin: So same trowel that a tiler would use or is it a little different for you guys?
Bill: So we use a V-notch.
Manufacturer recommends a V-notch so that we get these peaks.
And that helps when you put the wood and it helps it bond.
And it also gives it some room to move.
So, we are just spinning the board around.
So our tongue and groove is here.
So I'm just turning this board around.
Kevin: You want to -- You want to keep that tongue side on when you make the cut.
Bill: Correct.
And then I mark it here.
And as I cut it here, the tongue and groove will be back together.
Kevin: You want me to take those out to the saw for you?
Bill: Sure.
[ Saw buzzing ] Kevin: There's four more for you right there.
Bill: Thank you.
So, Kevin, we're going to put this last piece in, finishing off this row.
And what I like to do is push these four rows we just did back, taping them together kind of as a clamp.
I'm just going to grab some wedges.
I want to start here and then we'll work our way down.
Kevin: Beautiful.
Bill: So, Kevin, I'm going to push against this last row and tighten up.
And you can just tap so that we can get that tight.
And then you can put the tape on.
That tape will act as our clamp.
Kevin, if you can close that one by your right knee pushing towards the stairs.
Yes.
Kevin: Right there.
Ooh, look at that.
Bill: Beautiful.
Kevin: I can admit it now, Bill, but I saw some of these hairline gaps, and I was a little worried.
But you set me at ease.
You know what you're doing after all.
So as tight as those seams came together, you know, there are some imperfections.
A little corner right there.
Bill: So every board is not perfectly milled and every floor is not perfectly flat.
So when we hit a high or low spot, we may see a slight seam.
So what we do is we fill those gaps with a latex filler provided by the manufacturer.
It fills in, and once it's sanded, you won't even see it.
Kevin: Nice.
Right there.
So how much more time to finish the rest of this section here?
Bill: Probably about two to three hours.
Kevin: Not too bad.
Alright.
Nice system.
And they get a real red oak floor in here?
That's nice.
Bill: Yes.
Kevin: Alright.
Appreciate it.
Thanks for letting me work with you.
Bill: Thank you.
Kevin: I'll give that to you.
Bill: Thank you very much.
Kevin: Alright.
♪♪ ♪♪ Up here on the second floor, we've just got this one bathroom.
So with an entrance off of the center hallway, we'll have a toilet there.
We'll do double vanity here.
Obviously, the tub/shower here.
Skylight above, but also a second doorway here so that you can get direct access off the primary bedroom.
Charlie, Zack, how are you guys?
Charlie: Hey, Kevin.
Zack: Very good.
Charlie: How you doing?
Kevin: I'm doing alright.
So you're really nailing this modern look here for the primary bedroom.
Zack: Definitely.
Minimalism is the theme of this room.
You can see we've wrapped those existing collar ties with red oak to match the floor.
And then what Charlie is working on here is basically folding the red oak floor up the wall.
So by skinning it with this floor material we'll help disguise that door.
Kevin: I love it.
So, Charlie, you lined up the coursing on the floor with the coursing on the wall.
And how did you get this up there?
Because downstairs we were working with Bill and we troweled on adhesive, stuck it.
What'd you do?
Charlie: Up here, we were able to sheet the wall with plywood.
So in addition to just gluing it, we were able to shoot nails through the tongue and the board.
Kevin: Same process for getting it on the slab?
A little bit of glue, a little bit of nail?
Charlie: Yep, a construction adhesive and just toenailing through the tongue.
Kevin: So I guess you're going to want to get the door flush with the wall, right?
Complete that minimalist look?
Charlie: Exactly.
So I have a little mock-up here.
If you picture this as the the jamb face, we're going to use this concealed hinge here, and it's allowing us to create a flush door with nothing protruding out off the face.
Kevin: Adjustable?
Charlie: Lots of adjustments.
We've got up, down, left, right, which is going to be very helpful for us when we try and put this door in and make it disappear.
Kevin: Obviously flush, I see that, but also just a tiny reveal right there.
But enough so that it can fold back on itself.
So fully open.
Charlie: Exactly.
Kevin: Ooh, I love that.
Zack: Cool detail.
Kevin: And the slab that you skinned with the oak was what?
Zack: This is a standard 3/4" solid door slab, so that in conjunction with the engineered floor should keep this door nice and straight and stable.
Kevin: Okay, so are you at the mortising stage with these hinges?
Zack: We are.
Kevin: Alright.
Well, have at it.
Good luck.
Zack: Alright.
See ya.
Alright, Charlie, so you've done a bunch of these recently.
Where do you want to start with laying out these hinges?
Charlie: So with these hinges, we need to determine where we want to place them on the door.
First, we need to establish where the top and the bottom of the door is.
Zack: Right.
Charlie: So with doing this kind of stuff, to not get confused, I like to just kind of write on the door with as much, you know, info as I can so that I don't end up putting something in backwards or whatnot.
So with these, we've got a 7 1/2" hinge.
I like to put the top hinge say 10 inches off the top, 10 inches to the bottom.
So for this third hinge we're actually going to put it in this upper midsection.
So if you were to -- Zack: Why is that?
Charlie: They recommend that because of the door being so heavy, a lot of the stability and the sag is in the upper end.
So to have two hinges up on the higher end is going to create a lot more strength for it from sagging.
Zack: Makes sense.
Really heavy door.
Charlie: So if we were to divide this door in half it would be roughly 40.
And we've got this first one at 10.
I'm going to say that we want to put this third hinge at about 28 inches.
So now we've established the centers of our hinges on our door.
And now we need to transfer these marks to the jamb.
Zack: Right.
How do you want to do that?
Charlie: So we could just measure 10 inches and add an eighth to each of those measurements.
Zack: For the reveal at the top.
Charlie: For the reveal at the top.
But there's room for error in that.
So I like to use a stick like this and use it as a story pole in a sense.
Zack: Right.
Charlie: So if we were to take this stick here and flush it up with the top of the door, making sure everything's nice and straight, you want a nice straight stick.
Zack: Yeah.
Charlie: And then we take our pencil mark and transfer each of those tick marks.
Zack: Alright.
Got it.
Charlie: Awesome.
So I'm just going to make a mark for the top.
And we're going to bring this over here to the jamb.
And I'm going to take this 1/8 spacer and then slam our story pole up to it.
And then we can transfer our centers onto the jamb.
And we'll have the right reveal at the head of the door.
Zack: I love how easy that is.
Perfect.
So with the door hinges, when I purchase them, they sell us this template.
And there's a different template for the door side and for the frame side.
So I'm gonna get that router there.
Charlie: Yeah.
So we got a flush trim, top bearing, and a quarter-inch cutting head that's going to allow us to do this shallow 3/8 mortise first.
[ Whirring ] So the next step in this mortise is to do the deep mortise.
The deep mortise is about an inch and an eighth thick.
Since we only want to do this section of the hinge here, we've got these plastic tabs that we can screw in on each end, which will act as a stop, and we can plow out the deeper inch and an eighth material.
♪♪ ♪♪ ♪♪ Zack: So this is a similar concept.
We're going to be mortising the jamb this time.
So this template is slightly larger to accommodate the different-size hinge.
♪♪ Alright.
So that fits great.
So I'm going to put the door side in this mortise.
♪♪ Beautiful.
Alright.
Let's unclamp it and see how we did.
Charlie: Let's do it.
Zack: [ Grunting ] Oh, that's a heavy door.
Okay.
You want to line those hinges up?
I'll slide it to you.
Charlie: Sure.
Zack: Okay, here it comes.
Get that bottom one first.
Charlie: Okay.
Zack: Tell me.
Charlie: Looks good.
Nice.
Zack: Alright, I'm taking the shims out.
Ready to give it a shot?
Charlie: Let's check it out.
Zack: Moment of truth.
Oh!
Push it to me a little.
Wow, Charlie, that looks pretty stinking good, honestly.
Charlie: And we've got a lot of adjustments in those hinges so we can dial it in.
Zack: So we can probably go in towards you at the top hinge and out towards me at the bottom hinge.
Charlie: Okay.
Let's try again.
Zack: Alright.
I think that's perfect.
Charlie: Nice.
Zack: Well done.
Especially look at that one there where you put the board up, the dark one.
That's a nice touch.
I like that.
Charlie: Yeah, it wraps through.
Zack: Exactly.
Alright, let's finish this up.
What do you think?
Charlie: Sounds good.
♪♪ ♪♪ Jenn: So the backyard plan is really coming together.
We were inspired by our visit with our friends at the James Rose Center.
We talked about views from within the house, views all around, sitting outside.
So it's really tied it all together by bringing this patio.
We had to come out straight, but we dipped it with a nice radius out here to break up the patio into different sections.
So this could be a fire pit area.
And then over here they could have their dining table.
So it's a multi-use patio.
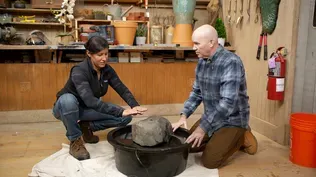
And as a feature on the side we're going to do a water feature.
So I brought Mark McCullough.
He and I cut a boulder together back in Boston and drove it all the way here.
And Genevieve is here to help us.
So what do you think of our rock?
Genevieve: I'm really excited about it.
I mean, how did it even get here?
Like... Jenn: Well... Mark: So, well, Jenn and I actually cut this in our shop.
We did a breakaway saw, and all that means is it has a saw with two blades.
And in the middle we have the stone.
We break that out and then we continue to cut until we're in half.
Jenn: Oh!
Mark: And then we took that core drill.
We drilled down all the way to the bottom.
And that's going to provide us a pathway for the water.
But orientation is really a huge part of where the rock lands.
So what do you think?
Genevieve: Yeah, I have some ideas about that actually.
I really like the moss on this side.
I can see the water coming down, it matching with the plants in the back.
Yeah.
It would look really great.
Jenn: I love moss on a boulder too.
There's a few steps that we need to do before we could place the boulder.
So let me show you.
Genevieve: Alright.
Mark: Let's go.
Jenn: So this is a basin.
I already have it installed in the ground.
I've leveled it and it is ready to go.
It holds about 100 gallons of water.
Mark: Right.
Jenn: And the boulder is going to go right here.
Genevieve: That thing's going to be able to support that weight?
Jenn: Yes.
This can hold up to 1,500 pounds.
And our rock is about -- Mark: Probably 500 or 600 pounds.
Jenn: Yeah.
So this chamber is a place.
It's an access panel for the pump.
Pump... sits right in here, and it recirculates the water.
Okay.
So next I want to put the liner down.
It's a rubber membrane.
And so any water that spills over the edge, it's going to just trickle back in here.
So I'm going to feed this pipe to you.
And it's going to -- When you see it over there, start to pull it up.
Mark: Yes.
Yes!
Yes.
Jenn: Alright.
Mark, how far should we pull this?
All the way to the end?
Mark: I think we bring it all the way through the end.
Once we bring it through the stone, we'll have to cut.
Jenn: Alright.
That should be good.
♪♪ ♪♪ Mark: Genevieve, how am I doing?
Genevieve: Just a little bit more.
Yeah, that's working.
Mark: Right there, Genevieve?
You like that?
Genevieve: It's good.
Mark: Alright.
Genevieve: Yeah.
Mark: Down, Joe.
♪♪ Okay.
♪♪ Here we go.
Jenn: Nice.
Genevieve: Nice.
Jenn: Nice.
Alright.
Now, all we have left to do is fill it and put the rocks in.
Kevin: Oh, look at this.
This is exciting, Jenn.
Huh?
This is great, Mark.
Jenn: I know.
Kevin: Yeah.
You need some strong backs to move some rocks?
Jenn: I would love that.
Kevin: Alright.
♪♪ Jenn: Alright, Mark, that's good for now.
Mark: Alright.
Gotcha.
Jenn: It can always be adjusted later, but who wants to see this thing fired up?
Kevin: Let's go.
Zack: Pretty excited.
Kevin: Pump it up.
Alright.
Jenn: Whoo!
Mark: There it is.
Zack: Well done.
Genevieve: Look at that.
Zack: It's awesome.
Kevin: Very nice.
Jenn: Zack, all I need is your electrician to hook up a switch for this.
Zack: I'll have Matt put a GFI in there next week.
Kevin: Speaking of next week, what's coming up?
Zack: Next time, we should have the trim wrapped up, kitchen cabinets going in, and we'll probably be wrapping up the tile in the bathroom.
Kevin: Alright.
Well, all that's coming up next time.
So until then, on behalf of all of us, I'm Kevin O'Connor for "This Old House" here in Ridgewood, New Jersey.
Jenn!
Mark: Nice.
Oh!
[ Laughter ] Kevin: Next time on "This Old House"... Tom: We're gonna do the tile backsplash.
♪♪ Bring the laser in and get them straightened out.
Jenn: Our patio and water feature have been installed, so now it's time to look at the overall health of the existing plantings, especially the sugar maple.
Richard: And when we got here, the heating system was a mess and it didn't work.
Now we've got a work of art.
Kevin: That's next time.


Funding for THIS OLD HOUSE is provided by The Home Depot and Renewal By Andersen.